

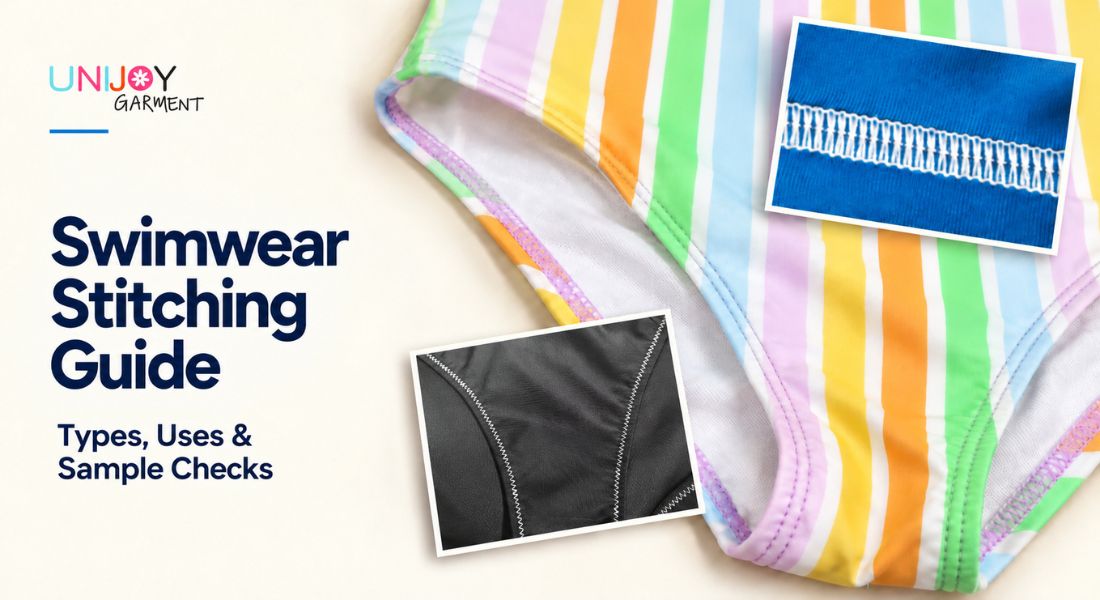
Two swimsuit samples can look similar until one seam opens under stretch, a leg edge turns wavy or a strap join feels bulky. The result depends on the stitch or seam construction, the materials and how the garment is sewn. This guide will help you recognize common swimwear stitching methods, understand where they are used and know what to check on a sample.
Table of Contents
Common Swimwear Stitching Methods and Seam Constructions
Swimwear uses a mix of stitching methods, seam constructions and local reinforcement. The table below compares five common stitching methods and constructions, including their appearance, typical locations and purpose.
| Stitching or construction | How it looks on the finished garment | Common locations | Main role or point to check |
|---|---|---|---|
| Overlock | Thread loops wrap around the cut fabric edges, usually on the inside; the outside mainly shows where the panels join | Side seams, panel joins, linings and gussets | Joins layers while covering the raw edges; check that the loops and join remain secure when stretched |
| Coverstitch | Usually parallel rows on the outside and thread loops covering the inside; some versions also have an outside covering thread | Hems, waist edges and turned elastic edges | Secures a folded or turned edge while allowing the seam to stretch; check for waviness, skipped stitches and uneven thread coverage |
| Flatseam / flatlock construction | A flat panel join with visible rows or covering threads; the exact appearance differs by construction | Rash guards, active swimwear and selected panel joins | Reduces bulk at the join; check both sides, stretch and skin comfort |
| Zigzag | A visible zigzag line rather than a straight row | Elastic attachment, stretch edges and selected design details | Allows the seam to stretch with the fabric; check stitch balance and fabric distortion |
| Bartack | A short, dense block of repeated stitches | Strap joins, tie points and other local stress points | Reinforces a small area; check that it holds securely without creating excessive stiffness or fabric damage |
Overlock
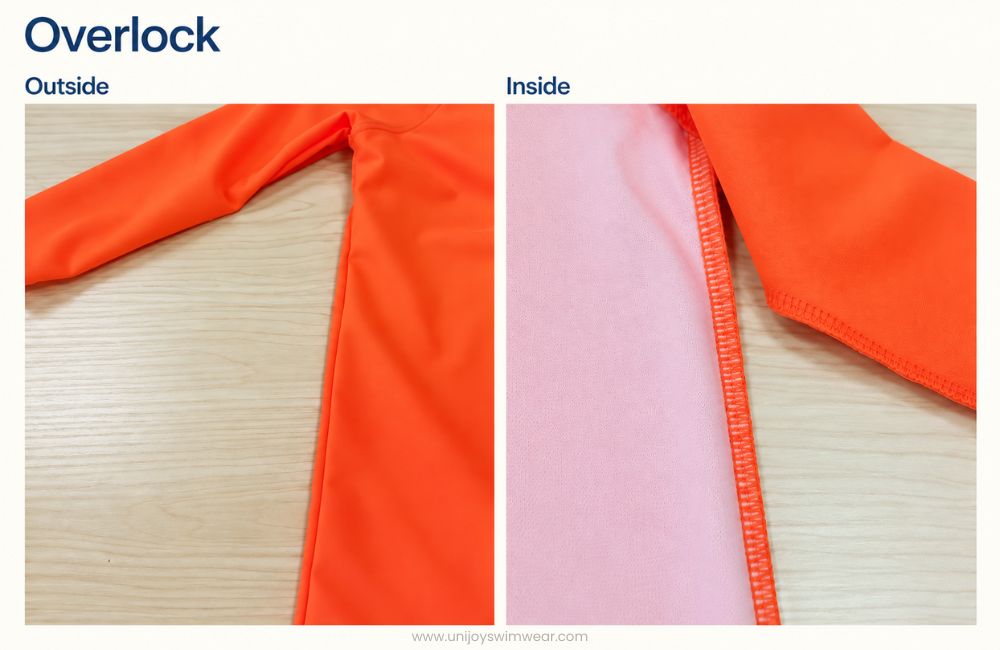
An overlock seam is easiest to identify from the inside of a swimsuit. Thread loops wrap around the cut fabric edges while one or more needle threads form the seam. From the outside, you mainly see where the panels join because most of the thread formation is hidden inside.
Overlock-based joining seams are commonly used to connect fabric panels, attach lining sections and assemble gussets. In those applications, the seam joins the layers while the thread loops also cover the cut edges. Other overedge formations are used only to contain a single cut edge rather than join panels.
The number of needles and threads changes how the seam is formed and secured. On the sample, check that the loops on the inside are continuous, the seam allowance is fully caught and the join does not open when gently stretched. The seam should return without loose loops, broken thread or a ridge that feels unnecessarily bulky.
Coverstitch
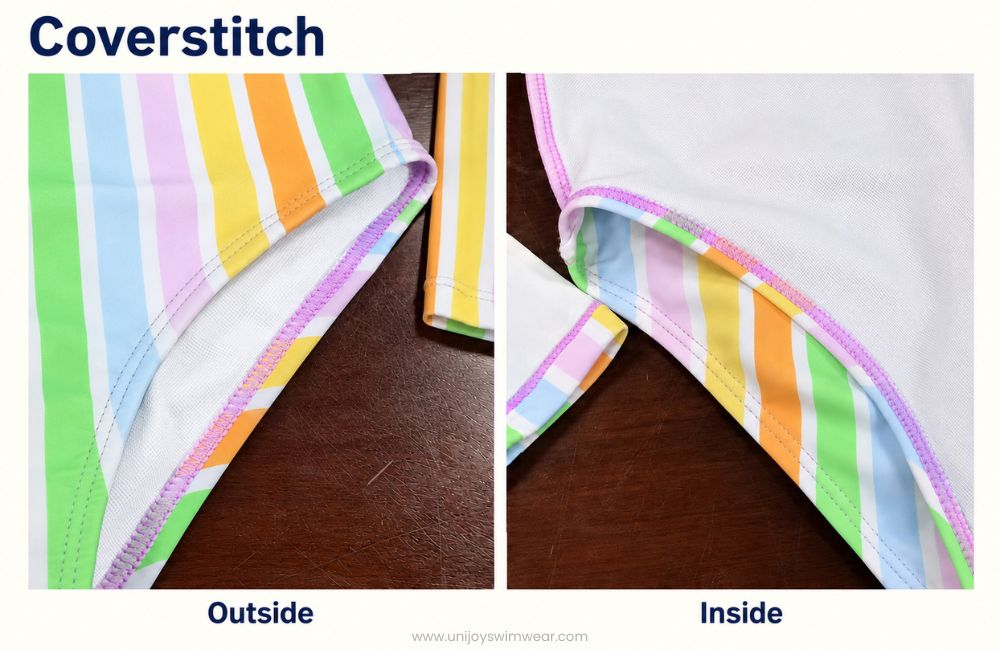
A common coverstitch finish shows two or three parallel needle rows on the outside and wider thread loops covering the inside. Some coverstitch versions also have a covering thread on the outside, so the visible finish is not always limited to parallel rows.
Coverstitch is often used after an edge has been folded or turned. Typical locations include leg openings, waist edges and hems. It can hold a turned elastic edge in place while keeping the finish flexible and relatively flat. The same edge may therefore involve more than one operation: elastic can first be attached to the fabric, then turned, and finally secured with coverstitch.
Check that the visible rows are even and follow the intended edge shape. The thread loops on the inside should be continuous, without missed sections. After you release the fabric, the edge should recover without obvious tunnelling—a raised ridge between the stitch rows—or waviness.
Flatseam / Flatlock Construction
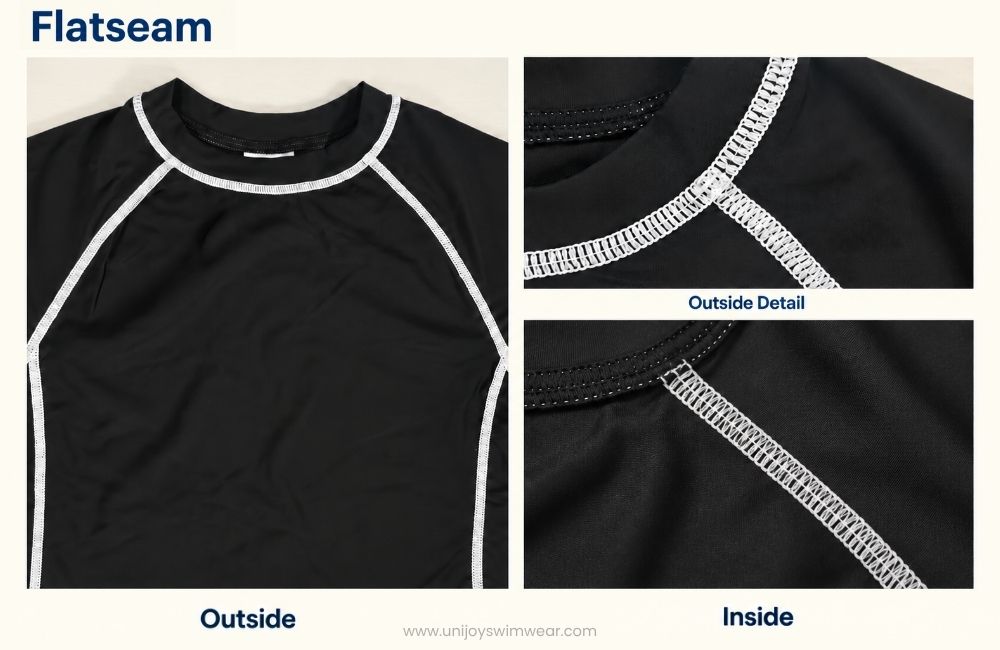
Flatseam and flatlock commonly describe panel joins designed to lie flatter than a conventional seam. In the finished garment, the fabric edges may meet or overlap in a way that reduces a raised seam allowance. Visible thread can appear on one or both sides. The terms vary by context, so the finished panel join is more useful than the name alone when identifying the construction.
This construction is useful where bulk and skin contact matter, such as rash guards, active swimwear and selected decorative panel joins.
Inspect how the fabric panels meet or overlap, how the join looks on the outside and inside, and whether any opening appears when it is stretched. Run a finger across the seam to check for a hard ridge or exposed thread that may rub the skin.
Zigzag
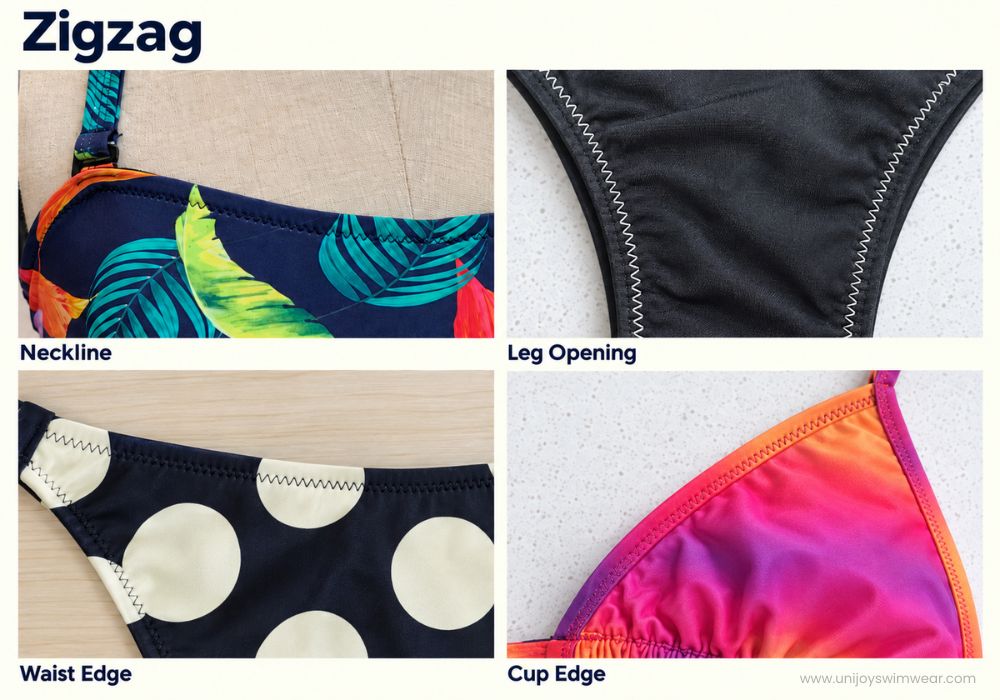
Zigzag stitching forms a repeated angled path instead of a straight row. The zigzag path provides extra thread length, allowing the seam to extend with the fabric.
In swimwear manufacturing, zigzag stitching can attach elastic, secure stretch edges or add a visible design detail. The stitch width and spacing depend on the specific job.
Check that the stitches catch the intended layers consistently and that the fabric is not pulled into a ridge between the stitch points. When the area is stretched, the thread should remain intact and the edge should recover without becoming wavy.
Bartack
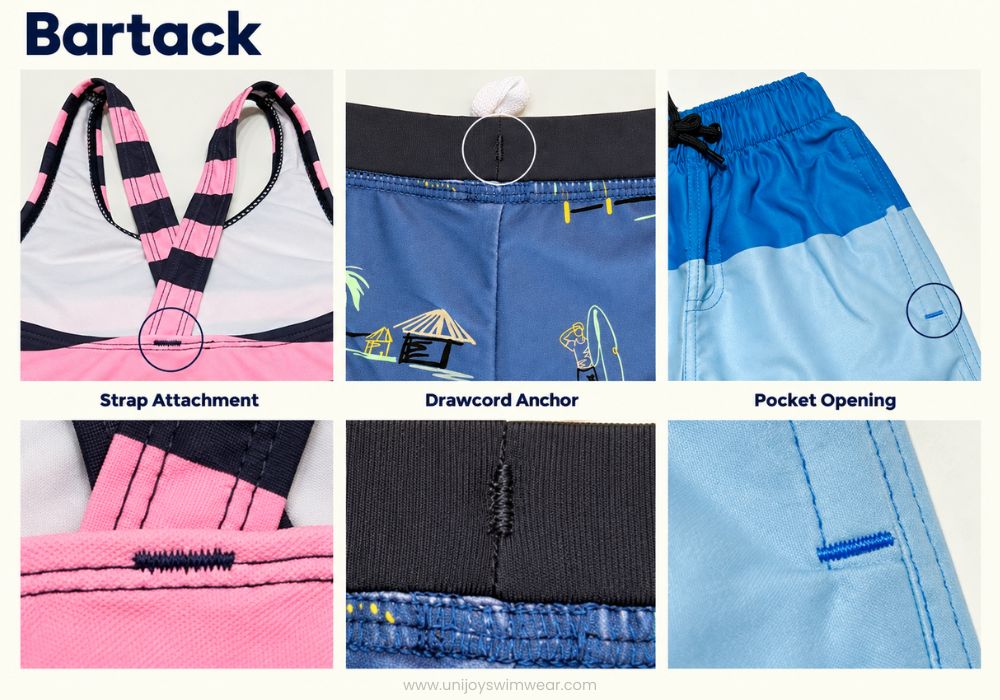
A bartack is a short, dense reinforcement rather than a method for sewing an entire panel seam. It concentrates stitches over a small area to help keep an attachment point secure.
Common locations include strap connections, tie attachment points and other places where force is concentrated. It can also reinforce the end of a seam when the design requires it. The bartack should cover the intended stress area without extending into an unwanted visible section.
Inspect whether all layers are caught and whether the reinforcement is centred. Dense stitching should not cut the fabric, create a hard lump or make a narrow strap uncomfortable. If a connection still pulls away from the garment, the solution may involve the bartack, the strap construction or the supporting layers—not only more stitches in the same spot.
Stitch, Seam, Machine and Edge Finish: A Short Distinction
A stitch is the thread formation made by the sewing process. A seam is the finished join between fabric pieces. A machine is the equipment used to produce a stitch or operation. An edge finish describes how an exposed or folded edge is completed.
These terms overlap in everyday factory communication, but they are not interchangeable, and one edge may require several operations. Binding wraps an edge with a strip, piping adds a raised corded or decorative detail, and bonding joins or finishes material with adhesive or heat-based processes instead of conventional sewing. These are separate construction options rather than alternative names for the five methods above.
Where Different Stitching Methods Are Used on Swimwear
The table below starts with the garment area rather than the stitch name. It shows common options and why they are chosen; the final choice should match the fabric, design, stretch and required finish.
| Swimwear area | Common stitching or construction options | Why the area may use them |
|---|---|---|
| Side seams and panel joins | Overlock; flatseam / flatlock construction on selected styles | Panels need a secure join; flatter constructions can reduce bulk or create a technical look |
| Necklines and leg openings | Elastic attachment followed by a turned edge; coverstitch; zigzag; binding or a clean-finished construction | The edge must hold close to the body while stretching during wear |
| Waist edges and lower hems | Coverstitch, turned elastic edge, zigzag or another specified edge finish | These edges need stretch, shape control and a consistent visible finish |
| Elastic inside an edge | Zigzag, overlock-based attachment or another controlled elastic-setting operation | Elastic must be distributed and held without overstretching the fabric |
| Shoulder straps and attachment points | Overlock or other seam construction for strap assembly; bartack or another local reinforcement at the connection | The strap itself needs smooth, even edges, while the attachment point must withstand concentrated force |
Checking the Stitching on Your Sample
Review the finished sample by checking how each seam stretches, feels and looks on the actual garment.
Stretch and Recovery
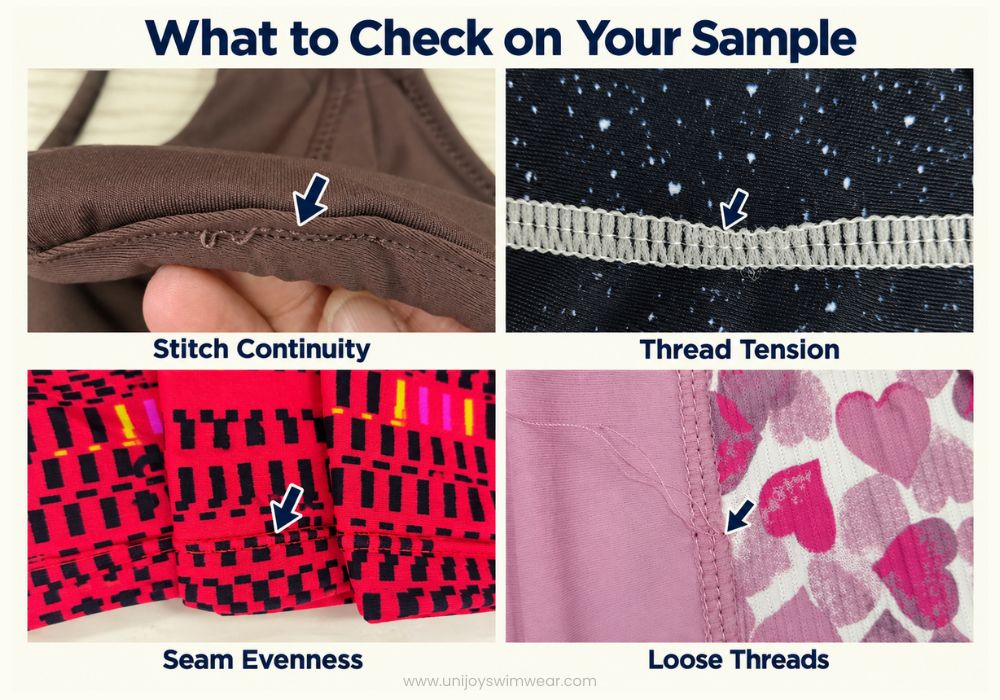
Stretch the seam gently in the direction it will be loaded during dressing and wear. Look for broken thread, opening between panels, tight stitches that restrict the fabric or loose loops that do not recover. This check can reveal obvious problems; any formal test should follow the agreed product requirements.
Skipped or Broken Stitches
Check curved edges, thick intersections and areas where elastic or several layers are sewn together. A skipped stitch leaves a break in an otherwise regular stitch pattern and can weaken the seam. Broken or frayed thread may also show that the needle, thread, tension, feeding or material combination needs adjustment.
Wavy or Distorted Edges
Lay the sample flat without pulling it. Necklines, leg openings, waist edges and hems should follow the intended shape. Watch for rippling, stretched corners, twisted elastic or left-to-right differences. A stretch edge can expand during inspection, but it should return to the expected shape after you release the fabric.
Comfort and Seam Bulk
Feel both sides of the seam, especially in high-contact areas and where several seams cross. Check for hard thread ridges, scratchy ends, bulky allowances, dense reinforcement or fabric layers that form a hard lump. A flat outside appearance does not automatically mean the inside will feel smooth.
Appearance and Consistency
Compare mirrored areas and repeated details. Stitch spacing, visible row width, distance from the edge and reinforcement position should be consistent. Also check thread colour and whether the outside and inside match the approved reference.
Swimwear Stitching FAQ
Developing a Swimwear Collection? Let’s Get the Stitching Right.
A swimsuit often combines several stitching methods to join panels, finish edges and reinforce attachment points. Learning to recognize their outside and inside appearance makes it easier to describe a design and review a sample.
Developing a new swimsuit line? Send your sketch, reference images or tech pack through our Contact Us page. We can review the construction details that should be confirmed before sampling.